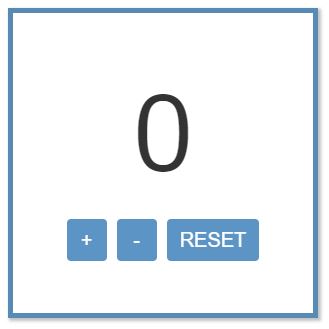
React+Reduxで作るカウントアプリ

もりけん塾(@terrace_tech)にて、React+Reduxを勉強しています。
React+Reduxの基本的なデータの流れを理解するために、カウントアプリを作ってみようともりた先生に提案していただきました。
そこで今回は、カウントアプリを作りながら、Reduxがどのような働きをするかを把握していきたいと思います。
(まだまだ学習途中なので、理解が浅い部分が多々あります。)
アプリを作成するにあたり、下記のインストールを行います。
// Reactのインストール
npx create-react-app PROJECT-NAME

// Reduxのインストール
npm install --save redux

// React Reduxのインストール
npm install --save react-redux
Reduxとは
Reduxは、アプリ全体のstate(UIの現在の状態)を管理するためのライブラリです。
React Reduxとして使用される機会は多いですが、Reactのためだけにあるものというわけではありません。
React Reduxの大まかな流れを、図に表してみました。

ここからは、実際にファイルを作成し、Reduxの動きを把握していきます。
必要なディレクトリとファイルの作成
上に上げたReduxの構成要素は、みんなそれぞれ別の役割をしているので、 1つのファイルにすべて書くのではなく、役割ごとにファイルを分けて作成した方が分かりやすいです。 なのではじめに、必要なディレクトリとファイルを作成しておきます。
/*
*
* src
*    / actions
*        + index.js
*    / components
*        + Counter.js
*    / constants
*        + action-types.js
*    / reducers
*        + index.js
*    / store
*        + index.js
*
*/
また、Appコンポーネントに、Counterコンポーネントをインポートしておきます。 (App.cssの中身は、ページ最下部に記載してあります)
[src/App.js]

import React from "react";
import Counter from "./components/Counter";
import "./App.css";

const App = () => {
    return <Counter />;
};

export default App;
1. storeを作る
まずはアプリ全体のデータベースとなる、storeを作るところから始めます。
storeを使うためには、createStore()という関数を呼び出す必要があります。
createStore()は、第一引数にreducerを受け取らせます。
この時点でreducerはまだ作られていませんが、後に作るので、まず reducer を引数に入れておきます。
[src/store/index.js]

import { createStore } from "redux";
import reducer from "../reducers";

const store = createStore(reducer);

export default store;
2. reducerファイルを編集する
reducerは唯一stateとコミュニケーションの取れる大事な要素です。 現時点ではまだ具体的な処理は書きませんが、全く何も書かないとエラーになりアプリが動かなくなってしまうので、とりあえず、stateを返す処理を書いておくことにします。
今回は、stateは reducerファイルの中に書きます。 カウントアプリの場合だと、初期の数字は0なので、0を入れます。
[src/reducers/index.js]

const initialState = {
    count: 0,
};

function reducer(state = initialState, action) {
    return state // ここに後で実際の処理を書きます
}

export default reducer;
3. React Reduxをアプリ全体に認知させる
React Reduxをアプリ全体に認知させるために、index.js内ですべてのコンポーネントを<Provider>で包みます。
[src/index.js]

import React from "react";
import { render } from "react-dom";
import { Provider } from "react-redux";
import store from "./store/index";
import App from "./App";

render(
  <Provider store={store}>
    <App />
  </Provider>,
  document.getElementById("root")
);
これでReact Reduxの下準備が整いました。
次は、実際にコンポーネントからstoreにアクセスしていきます。
4. 現在のカウントを表示させる
Counterコンポーネントに、下記のように記載します。
[src/components/Counter.js]

import React from "react";
import { connect } from "react-redux";

// stateを受け取る
const mapStateToProps= (state) => {
    return { count: state.count };
};

const Counter = ({ count }) => {
    return (
        <div className="container">
            <div className="box">
                <span>{count}</span>
                <div className="control">
                    <button>+</button>
                    <button>-</button>
                    <button>RESET</button>
                </div>
            </div>
        </div>
    );
};

export default connect(mapStateToProps)(Counter);
[解説] mapStateToProps
const mapStateToProps= (state) => {
    return { count: state.count };
};
現在のカウントは、 count: 0 と設定してあります。
このstateの数字をCounterコンポーネントに表示させます。
stateをpropsとしてコンポーネントで受け取るためには、mapStateToPropsを使用します。
これでstateがpropsとしてコンポーネント内で使用できるようになったので、
Counterコンポーネントにconst Counter = ({ count }) => {と記載し、propsを通してあげます。
[解説] connect
export default connect(mapStateToProps)(Counter);
connect()は、stateが更新されるたびに呼び出される関数です。
実行されると、すべてのstateの値を受け取ります。
そこで、mapStateToPropsを引数に取ることで、コンポーネントが必要なstateの情報だけ(mapStateToPropsに記載したstate)を取り出してくれます。
これでstate.counterの数字が表示されるようになりました。
もし本当にstateの数字が表示されているか確かめたい場合は、試しにsrc/reducers/index.js のinitialStateの数字を変更してみるといいかもしれません。
initialState = {
    count: 100 //ブラウザに 100 と表示されたらオッケーです
}
今度は、このstate.countの数字を更新する処理を書いていきます。
5. ボタンを押したら数字が更新したい
実現したい処理は「ボタンを押したら、stateの数字が更新される」ことです。
しかし、コンポーネントからボタンを押しても、直接stateの数字を更新することはしてはいけません。 Reduxシステムの元では、コンポーネントはあくまでstateのデータを表示させることだけしか出来ないのです。 stateの数字を変更したい場合は、必ず一度、reducerを通して更新されないといけません。
では、コンポーネントがどうやってreducerとコミュニケーションを取るかというと、 actionをdispatch(伝達)することで実現出来ます。
6. actionの設定をactionファイルに記載する
actionは「stateに対して、どのような処理を行いたいか」という、動作の設定です。
今回のカウントアプリでは、各actionは下記のように設定しました。
- increment:state.counterの数字に+1する
- decrement:state.counterの数字から-1する
- reset:現在のstate.counterの数字を0にする
定数ファイルを作っておく
actionを作る前にまず、定数ファイルを作っておきます。 理由は、タイプミスを防ぐためです。 このactionは、reducer、コンポーネント内で何回も使います。 そのため、タイプミスを防ぐために、事前に定数を設定しておいた方がいいのです。
[src/constants/action-types.js]

export const INCREMENT = "INCREMENT";
export const DECREMENT = "DECREMENT";
export const RESET = "RESET";
次に、actionファイルにactionを設定していきます。
[src/actions/index.js]

import { INCREMENT, DECREMENT, RESET } from "../constants/action-types";

export function increment() {
  return {
    type: INCREMENT
  };
}
export function decrement() {
  return {
    type: DECREMENT
  };
}
export function reset() {
  return {
    type: RESET
  };
}
7. reducerの設定をreducerファイルに記載する
reducerに渡したいactionが決まったので、
次に、reducerに「このactionがdispatchされてきたら、こういう処理をする」という設定を記載します。
この「○○の場合は○○にする」を設定するには、switch文を使用します。
defaultは、必ず設定する必要があります。 なぜなら、アプリを立ち上げた一番最初の状態では、 何のactionもdispatchされていないため(このアプリの場合、ボタンをクリックして初めてactionがdispatchされます)、 3つのcaseのどれにも当てはまらず、何を返したらいいか分からなくなり、エラーを起こすからです。
[src/reducers/index.js]

function reducer(state = initialState, action) {
    switch (action.type) {
        case INCREMENT:
            return {
                count: state.count + 1,
            };
        case DECREMENT:
            return {
                count: state.count - 1,
            };
        case RESET:
            return {
                count: 0,
            };
        default:
            return state;
    }
}
8. コンポーネント内で、actionをreducerに渡す
コンポーネントにmapToDispatchを追加し、引数として connect() に通します。
connect()でつながったコンポーネントは、 stateが更新される度に、更新されたstateをpropsとして受け取ることが出来るようになります。
[src/components/Counter.js]

import React from "react";
import { connect } from "react-redux";
import { increment, decrement, reset } from "../actions";

const mapStateToProps = (state) => {
    return { count: state.count };
};

const mapDispatchToProps = {
    increment,
    decrement,
    reset
};

const Counter = ({ count, increment, decrement, reset }) => {
    return (
        <div className="container">
            <div className="box">
                <span>{count}</span>
                <div className="control">
                    <button onClick={increment}>+</button>
                    <button onClick={decrement}>-</button>
                    <button onClick={reset}>RESET</button>
                </div>
            </div>
        </div>
    );
};

export default connect(
  mapStateToProps,
  mapDispatchToProps
)(Counter);
これで、カウントアプリが動くようになりました。 実際に動いているサンプルは下記のリンク先で確認できます。
Codesandbox|React + Redux カウントアプリ
まとめ
今回のReact + Reduxによるカウントアプリで学んだ、React + Reduxの要点をまとめました。
- コンポーネントはstateの数字を変更できない。出来るのは、stateの中身を表示させることだけ。
- stateを更新できるのは、reducerだけ。
- コンポーネントがreducerにstateの更新を頼みたい場合は、reducerにactionをdispatchする
- reducerは、コンポーネントからdispatchされたactionを元に、必要な情報だけをstateから取り出し、propsとしてコンポーネントに渡す。
その他
今回使用したCSSです。
[src/App.css]

.container {
    display: flex;
    flex-direction: column;
    justify-content: center;
    align-items: center;
    height: 80vh;
}
.box {
    width: 300px;
    height: 300px;
    align-self: bottom;
    -webkit-box-shadow: 2px 2px 3px 1px rgba(0, 0, 0, 0.3);
    -moz-box-shadow: 2px 2px 3px 1px rgba(0, 0, 0, 0.3);
    box-shadow: 2px 2px 3px 1px rgba(0, 0, 0, 0.3);
    display: flex;
    flex-direction: column;
    justify-content: center;
    align-items: center;
    border: 5px solid #2e6da4;
    opacity: 0.8;
}
span {
    display: inline-block;
    text-align: center;
    font-size: 100px;
}
button {
    cursor: pointer;
    margin: 5px;
    color: #fff;
    background-color: #337ab7;
    border-color: #2e6da4;
    display: inline-block;
    margin-bottom: 0;
    font-weight: 400;
    text-align: center;
    white-space: nowrap;
    vertical-align: middle;
    -ms-touch-action: manipulation;
    touch-action: manipulation;
    cursor: pointer;
    background-image: none;
    border: 1px solid transparent;
    padding: 6px 12px;
    font-size: 20px;
    line-height: 1.42857143;
    border-radius: 4px;
    -webkit-user-select: none;
    -moz-user-select: none;
    -ms-user-select: none;
    user-select: none;
    min-width: 40px;
    outline: none;
}
もりた先生の詳細情報はこちらです!
[もりけん塾]